Table of Content
Here is a Simple DIY Home Automation System Code, you can copy the code and paste it in your Arduino IDE. But before that, you need to add Blynk Library to Arduino IDE. Finally, you can use nodemcu to create a home automation system that is completely customised to your needs. Maker.pro needs to review the security of your connection before proceeding. Here is a link for a small solid state relay package that is offered in 2,4, or 8 channels. 2) Next, it will list all the available devices in your vicinity. You can either upgrade to a higher current relay, or place multiple relays in parallel.

You can also purchase individual 433 MHz transmitters ready for use on eBay or from hobby electronics suppliers. All you need to is connect the VCC to 5 V on the Arduino, the GNDs, and a single control pin - remember which one you used. This last command will launch the Mongo server, and you'll need to open a new Terminal to continue with the other commands. I'm not entirely confident of this step, so if anyone can correct this in the comments on how to have mongod launching automatically on start up, it would be much appreciated.
What’s inside the eBook?
To facilitate the wireless connectivity with the system, the Arduino Uno will be embedded with a WiFi module. This establishes the internet connection to the system and all the home appliances can in turn be connected and controlled by internet. Instead of concentrating on the simple things like lights or automated blinds, elecronichamsters goes all in.

To access the local home automation system from anywhere, we’ll use Cloudflare tunnels. However, if you don’t want to spend countless hours searching for the right information and if you want to accelerate the learning curve, our eBook is a better option. If there’s something extra that you need to learn during the eBook, we’ll point you to the right resource. Appendix— quick guide with Linux commands and how to execute Linux commands via Node-RED. Each module breaks down a specific concept of the home automation system and allows for quick referencing in the future.
TV, DVD & Audio Control From Android and Arduino
Facebook Conversion API Events help us better understand how you interact with our websites. They allow us to measure the impact of our ads on the website's conversions and they improve ads targeting through custom audiences. When possible, we might share with Facebook information like name, email, phone, address. Facebook Advanced Matching can improve ads attribution and conversion tracking. It can help us reach better-targeted custom audiences through our ads. When possible, we will share with Facebook hashed information like your name, phone, email, or address.
In Module 9, if you want to access your Home Automation System outside your local network, you’ll need a domain name. You can use a free domain name or you can get a paid domain name in order to create a secure tunnel with Cloudflare. If you don’t have a Raspberry Pi, you can use Digital Ocean , but you’ll need to pay for a monthly plan. You can create rules on Node-RED and schedule events to make things happen automatically. For example, turn something on or off depending on sensor readings, day and time of the week, etc. The following diagram shows a quick overview of the system you’ll learn how to build.
Step 3: Step 3: Schematics
3) Once you select the device, you’ll be connected to the HC-05 transceiver. The app will now prompt you to enter the mode that you wish to use. We want to turn on the bulb only when we send a signal from smartphone. If you have a multi-channel module , you can connect IN2, IN3 … In with different digital pins on the Arduino, and repeat the steps below for configuring the other pins. We don’t use the STATE and EN pins on the HC-05 module, since they are not required for this setup. The HC-05 is powered using 5VDC but includes an on-board voltage regulator that generates a 3.3V supply to power the transceiver.
2) Power the HC-05 module by connecting the 5V and GND pins to the bus strips on the breadboard. Finally, in the void loop, we check for commands from the Bluetooth serial and turn on and off the lights accordingly. BTserial object, you would have to mention the order of the Tx and Rx pins as connected in the Arduino.
This can include tasks such as turning on the lights when you enter a room, or setting the thermostat to a certain temperature. Home automation systems can be as simple or as complex as you like, and there are many different products on the market to suit different needs. In this tutorial, we will show you how to build a simple DIY home automation system using a NODEMCU and a few other components. You can monitor and control your home’s energy usage, security system, and much more. For this application we’re using a relay module which includes the relay drive circuit allowing it to connect directly to a microcontroller GPIO pin. The device can also be connected to an Android App which you can develop on your own using some applications like MIT App inventor etc.
You can now build a home that is more enjoyable to spend time in for you, your family, and any guests you have over. The good old-fashioned pinball machine is a tried-and-tested form of entertainment, a staple of arcades and bars the world over. In your home, a pinball machine can be the perfect way to entertain guests or even just keep yourself busy. When you set up the device, it will open Firefox and start playing Netflix. The bike will monitor your speed according to a routine you designed, and if you fall below your desired speed for too long Netflix will pause until you speed up again.
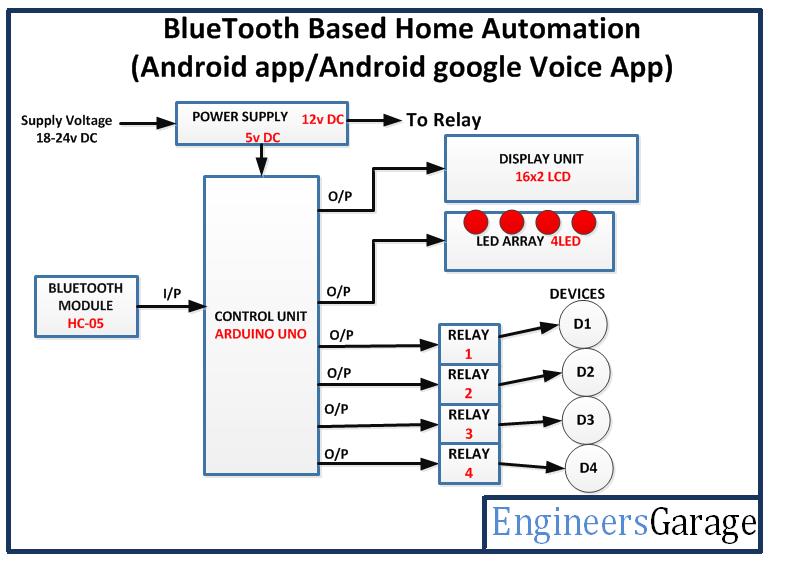
3) Connect the TXD pin on the HC-05 module with the RXD pin on the Arduino. The core hardware is rather simple and only consists of an Arduino microcontroller kit, a Bluetooth wireless module, and a relay. We will need a variable to store the message received by the HC-05 module, and variables mentioning the pins to which the LEDs are connected. This project is an IoT-based home automation system, where you can control lights via Bluetooth. The plugin works by sending "tristate codes", but these will vary by manufacturer. We're going to use Raspian for this project, and I'd strongly suggest starting from a fresh install if you've previously performed other hacks and such.
If you get stuck at some point, you can use our forum to post your issue. You can also send us an email with your issue, and we’ll try to help as much as possible so that you get all examples working. We use Raspberry Pi to run Node-RED, Mosquitto MQTT broker, and InfluxDB locally.
Stop the Heimcontrol app if it's running and install the Arduino bridge using the following command. I've used some reasonably cheap £20 sets from Maplin which come with 3 sockets, and opened up the remote control so I could interface directly with the 433 MHz chip inside. The installation process is quite laborious, and derived from the instructions here. Unfortunately, these were outdated or not designed for Raspian, so I've adjusted them heavily below. The codes below can mostly be pasted in blocks - you needn't paste one by one.
All you need is an Arduino Board, some relays and an android phone. In this section, you’ll learn how to add an ESP32-CAM surveillance camera to your Node-RED home automation system. The ESP32-CAM is a development board with an ESP32-S chip, an OV2640 camera, microSD card slot and several GPIOs to connect peripherals. This Module explains how to set up a Cloudflare tunnel to access your Node-RED home automation system and InfluxD monitoring dashboards from anywhere. The main objective of this project is to build a smart home device which can be used to control the home appliances via internet. The home automation device that you build can be integrated with almost all the home appliances and can be used to control them remotely from any part of the world.
Introduction: Home Automation Using Arduino Uno
We provide instructions for installing Node‑RED, InfluxDB, and Mosquitto broker on Digital Ocean . Node-RED can send the sensor readings and any other data to InfluxDB . You can learn from experts, build working projects, showcase skills to the world and grab the best jobs. James has a BSc in Artificial Intelligence and is CompTIA A+ and Network+ certified. When he's not busy as Hardware Reviews Editor, he enjoys LEGO, VR, and board games. Before joining MakeUseOf, he was a lighting technician, English teacher, and data center engineer.


No comments:
Post a Comment